Blog From JaneIredale.com
Even if you’re not a total beauty junkie, chances are you have heard of highlighting and contouring. They’ve been around forever, but it seems every few months new techniques make their way into mainstream conversations thanks to bloggers and social media. Think of strobing, clowning and baking, to start. The reason these techniques are so popular is because of the results they provide. Highlighting and contouring work together to sculpt and refine your face and enhance the features you love, making them a fun way to play around with different looks, even if it’s just for date night. Some tutorials can be intimidating and look like you need to use a lot of makeup, but really the most important thing to remember when trying any new makeup technique is you can keep it really simple or go dramatic to get the results you are looking for.
There are several methods and products used for highlighting and contouring. What makes them successful is:
- Each one complements the other to achieve the optimum result.
- They’re appropriate for the setting (e.g. heavy shading is best for nighttime looks).
- They’re well blended.
- The shades used are as natural-looking as possible.
Let’s start by learning to apply highlighter!

How to Apply Highlighter
Highlighting your Face in 3 Easy Steps
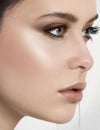
If you’re a highlighting novice, here’s a quick tutorial to bring the focus to the center of your face, make you look more awake, and get you out of the house fast! The purpose of highlighting is to emphasize and bring areas forward. Highlighting shades should be lighter than your skin tone, and they can be matte or contain shimmer. The best three places to apply a highlighter are:
- Under your eyes on your cheekbone.
- Down to the bridge of your nose.
- Across the upper apples of your cheeks, just past the outer corners of your eyes.
Advanced Highlighting Techniques
Are you ready to take the next step in highlighting? Here’s where to apply highlighter for more dramatic results:
- Center of your forehead –Gently brush a matte highlighter outward in a star-shaped pattern.
- Bridge of your nose –Sweep highlighter down the bridge of your nose to bring attention to the middle of your face.
- Inner corner of your eyes –Dab a champagne or gold (depending on your undertones) highlighter in the corners to make your eyes pop.
- Brow bone –Apply a shimmery highlighter on your brow bone to emphasize your arch, help hide stray hairs and give the illusion of larger eyes.
- Top of your cheekbone –Brush highlighter on your cheek bone to diminish the appearance of dark under-eye circles and define your cheek bone.
- Upper apple of your cheek –Add luminosity to the apples of your cheeks by applying highlighter over your blush.
- Cupid’s bow –Using a concealer brush, apply a small amount of highlighter to your cupid’s bow to give your lips a more dimensional look.
- Center of your bottom lip –With your finger, dab shimmer in the middle of your bottom lip to make it look fuller.
- Center of your chin –A touch of highlighter at the center of your chin helps guide attention toward the center line of your face.
Best Highlighters from jane iredale
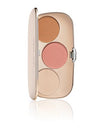
Here are some of our products that are useful for highlighting: I would mention here cream vs powder can achieve similar results, but it’s more about preference
- In Touch Highlighters: They’re easy to apply!
- Foundations and concealers: Pick a mineral foundation that is a shade or two lighter than your skin tone or try Active Light Under-eye Concealer.
- Matte-based eye shadows: Try shades like White, Bone or Champagne PurePressed Eye Shadow.
- Shimmery cream eye shadow primers: The new Smooth Affair for Eyes in Naked, Canvas or Goldmake great highlighters.
Practice Makes Perfect
Now it’s time to practice your new highlighting skills. Post pictures on Instagram of your best highlighter looks from a little shimmer to major strobing. Remember to tag us using @janeiredale and #friendfavorite for your chance to be featured on our page!


